Introduction
The time has finally come for another blog post. Life has gotten in the way, and as a result, this blog hasn’t been anywhere near as active as I’d planned. In fact, I have several partially done articles that have been waiting for over a year. In this post, I’ll go over a couple key findings from my recent upgrade to the latest version of Capture One Pro. Moving forwards, I suspect that Capture One Pro is destined to become a integral part of my digital workflow moving forwards.
Capture One Pro 8 is software from Phase One, that allows its users to rapidly review, and process a large number of RAW photographs. While not as well known as Adobe Camera RAW, Adobe Lightroom, or DxO Optics Pro, it is none the less, a very high-end piece of software capable of producing results that are superior to the offerings from Adobe (I can’t comment on DxO Optics Pro, as I lack personal experience with the product).
I’ve been a user of Capture One for a number of years. I believe I started in the Summer of 2011. Up until a couple of weeks ago, I’ve only used Version 6. While I found Version 6 to be phenomenal for colour photographs taken using my Leica M9, I’ve only rarely used it for my Nikon D-SLR’s. Once Adobe moved to Adobe Camera RAW v7, the need for it, for Nikon images seemed to be greatly reduced. Yet, even with the latest versions of ACR, it still seemed the best way to process Leica images.
I never got around to upgrading to Capture One version 7. Early on in the release of v7, I’d thought about it, but had held off due to all of the negative comments about major issues with slowness. While v8 has been out for a while, I’d finally started getting colour images out of ACR that I was happy with, so hadn’t thought about upgrading. Recently though Phase One had a really good sale on the v8 upgrade, too good to pass up, and I purchased the upgrade, only to learn that until I upgraded my OS, I wouldn’t be able to run it. As I was running too old of a version of Mac OS X to be able to run the latest version of Adobe Photoshop CC (2015), I was already planning on upgrading. Finally at the beginning of November, I upgraded my system to Mac OS X 10.11.
Capture One and Chromatic Aberrations
I started around playing with a few images, and was quite pleased with what I saw with its handling of Chromatic Aberrations. While it still can’t totally help with the issues I’ve seen when shooting with a Nikkor 85mm f/1.4G wide open, it definitely helps a little.
To highlight the issue I have with the Nikkor 85mm f/1.4G lens, and its Chromatic Aberration problems, I’ve tightly cropped a photograph of a little boy holding his Grandfather’s saber. For the three example photographs, pay close attention to the pommel. This first photograph is straight from the camera, unedited.
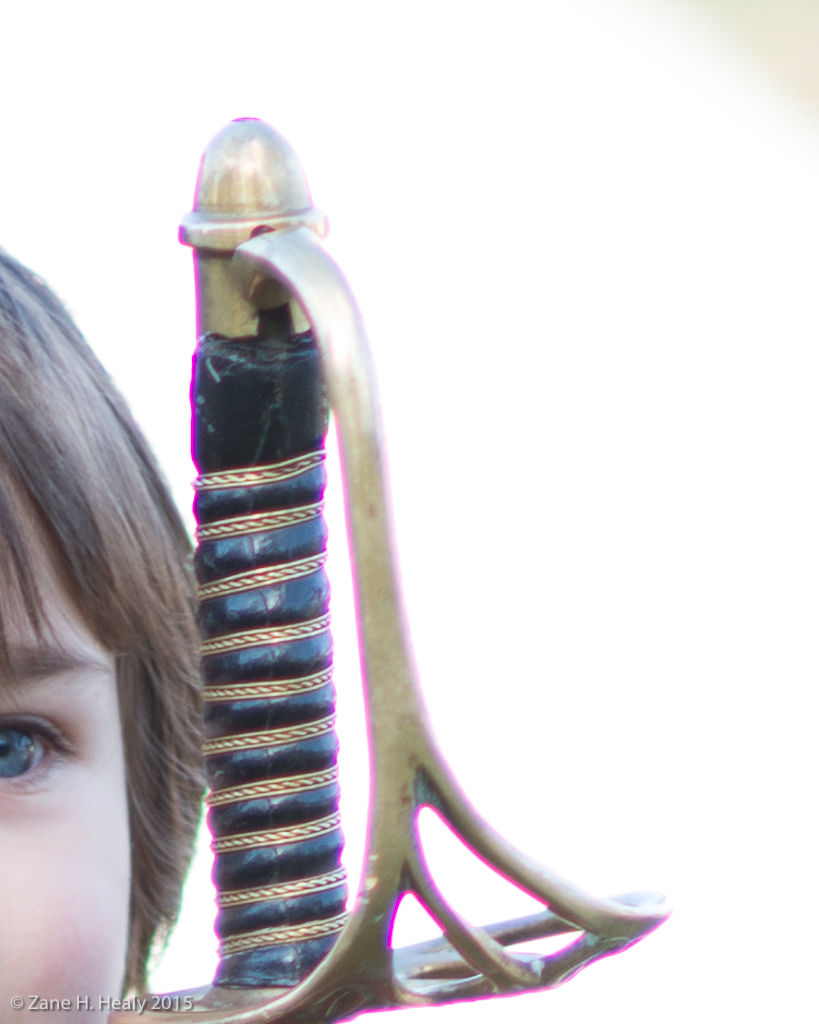
Unedited image taken with Nikon D800 and Nikkor 85mm f/1.4G lens @ f/1.4
In this next photography I used Adobe LIghtroom 5 to attempt to remove the CA fringing. As you can see, Lightroom is able to do a fairly decent job, but there is still the slightest hint of fringing going on around the hand guard, and the pommel has some weird bits of CA.
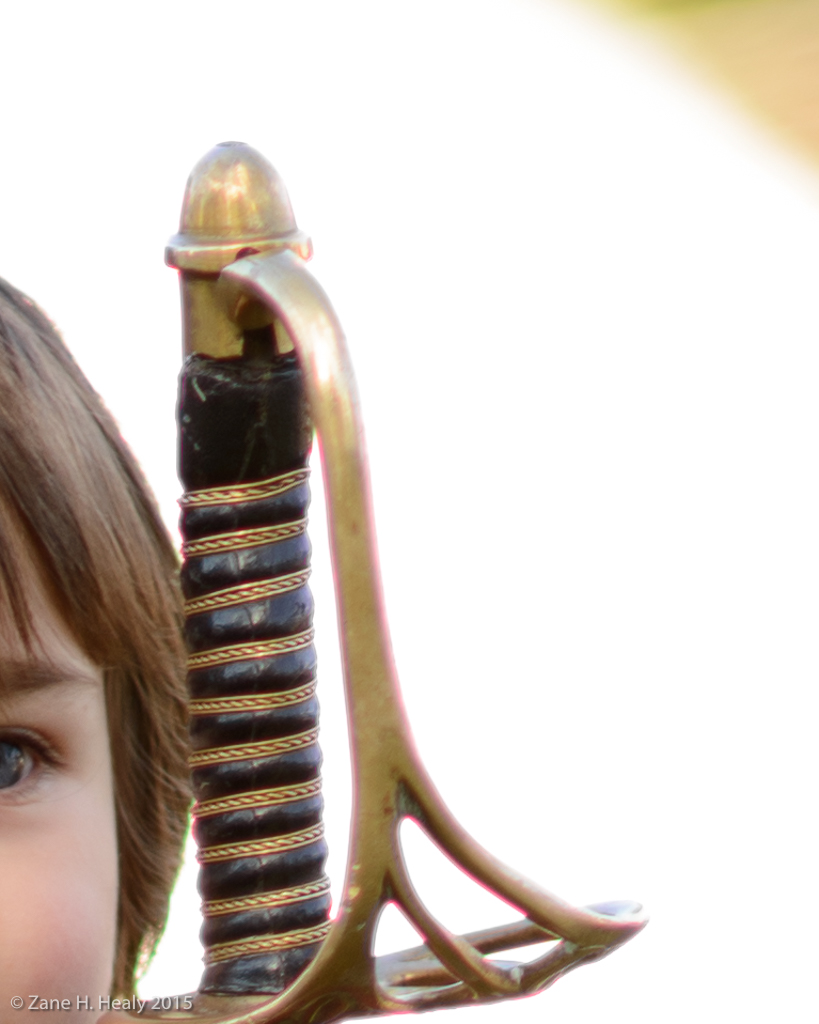
Lightroom CC’s handling of Nikkor 85mm f/1.4G CA
In the final of the three examples, I used Capture One, and was able to completely remove the fringing from the Chromatic Aberrations, but then I corrected the white balance, at which point some of the problems with CA returned slightly. While overall the issues have been corrected, there is just a slight hint of discolouration around the edges of the hand guard. In this case both the handle and the pommel look pretty good.
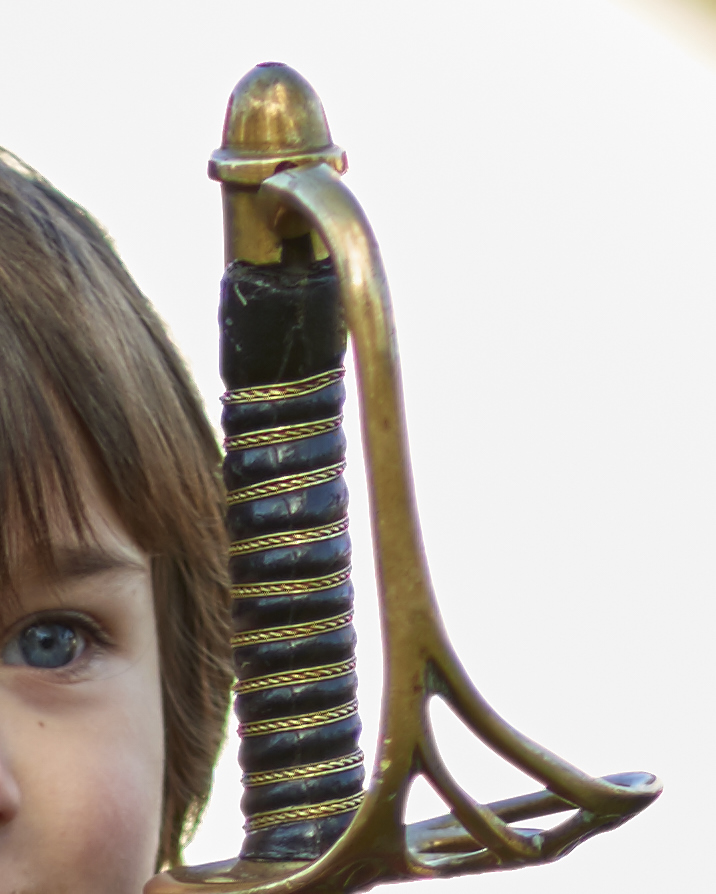
How Capture One 8.3.3 is able to to handle the Nikkor 85mm f/1.4G CA
Capture One and Digital Noise
While I was pleased with the results from the CA testing, they weren’t earth shattering. Then I started working on some “Coastal Defense Fort” photographs I’d taken in 2013. That is when things started to get interesting. Initially I was working on most of them in Adobe Lightroom, though I did one or two in Adobe Bridge/ACR/Photoshop, as I find I’m able to do slightly finer adjustments on the RAW images using ACR, rather than Lightroom (yes, I realize at the heart, they’re the same).
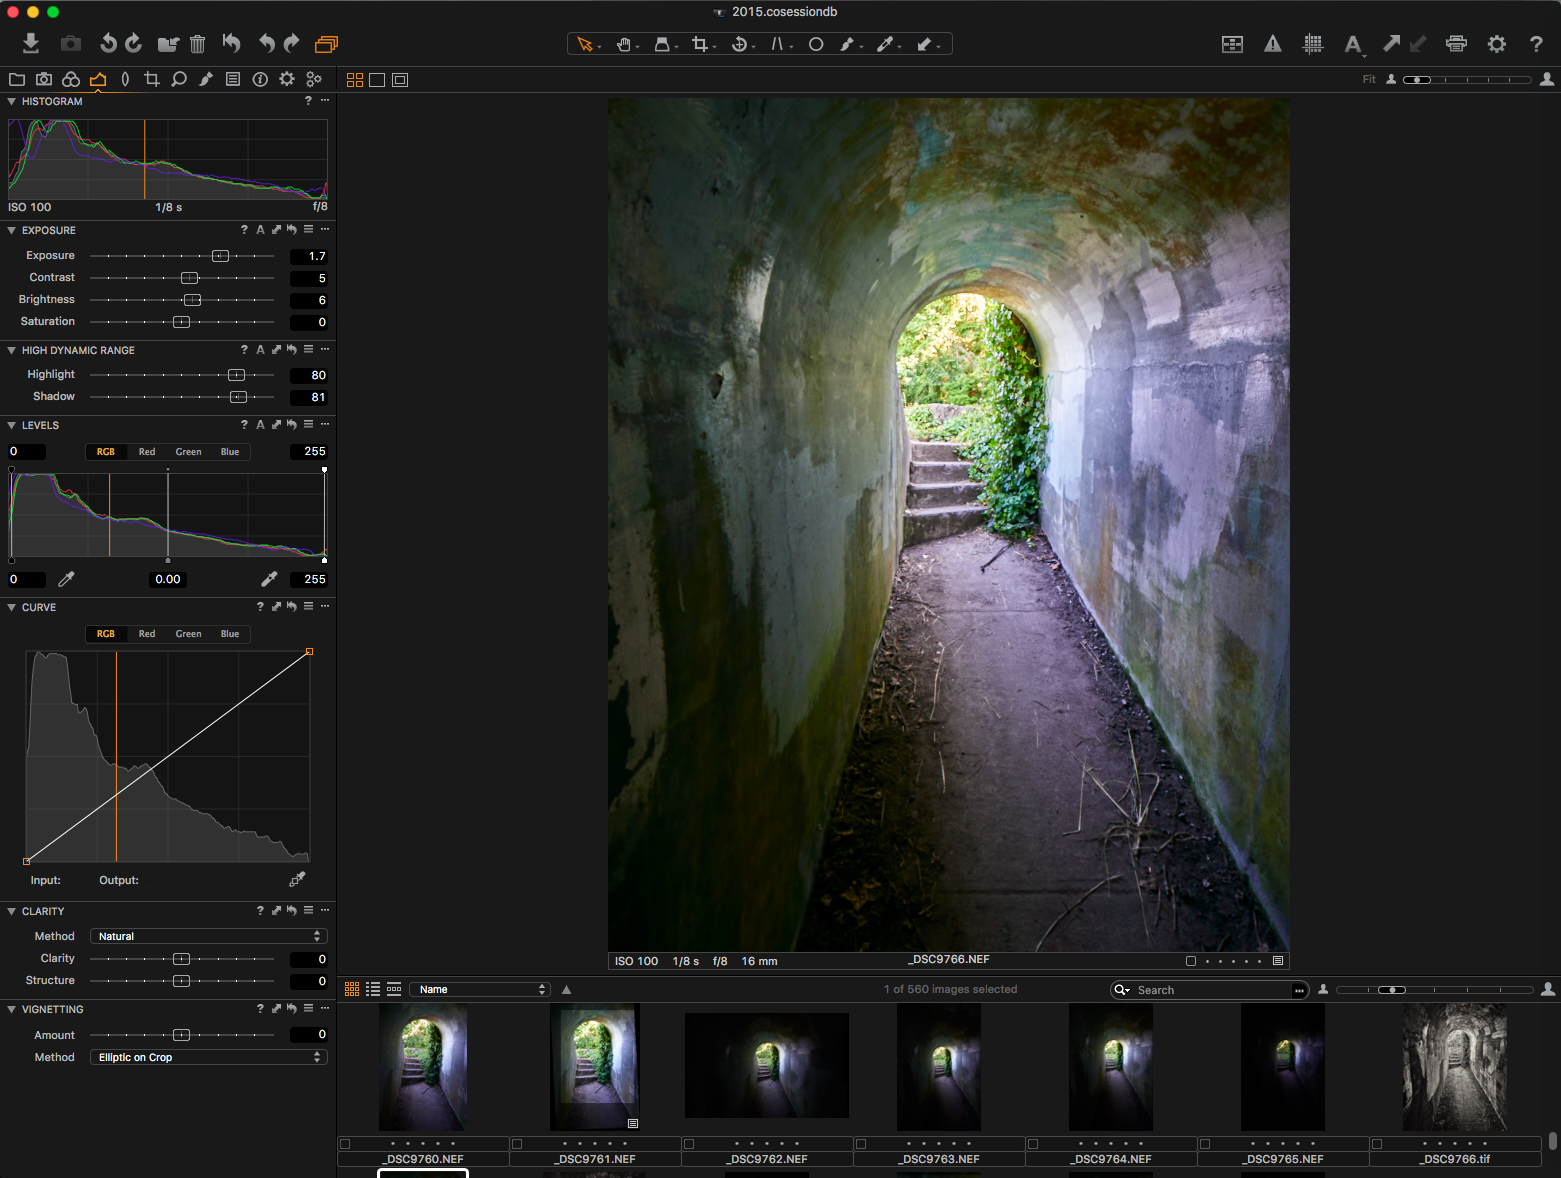
When I was working on “Watch Your Step!”, I simply wasn’t happy with how the lower part of the stairs were turning out. It was a very tricky shot, the exposure was for a 110 seconds. The light at the bottom of the stairs, was coming from a doorway in the middle of a decent sized tunnel, and the light at the top coming from the window slits in the observation booth, that was up some other stairs about 20-30 feet away. So I decided to give Capture One a try, and immediately got the results I was after. I then tried several other photographs, with difficult lighting situations, taken in the bowels of some of the Mortar Batteries. That’s when I started noticing just how clean the images were, compared to B&W photo’s done in this fashion that used either Adobe Lightroom, or Adobe Photoshop for the RAW processing. In all cases, the B&W conversions were done using the same custom Silver Efex Pro 2 preset.

Watch Your Step!
The following photographs provide an example of the noise levels between Adobe and Capture One. The example for Capture One, is about the worst I’ve seen it do thus far, yet the Adobe Lightroom example is noticeably worse.
Capture One 8.3.3 preparing “Tunnel’s End”.
The two digital noise examples are taken from the upper left-hand corner of the following image. The complete image shown here was processed using Capture One and Silver Efex Pro 2.

Tunnel’s End, Fort Worden, Washington
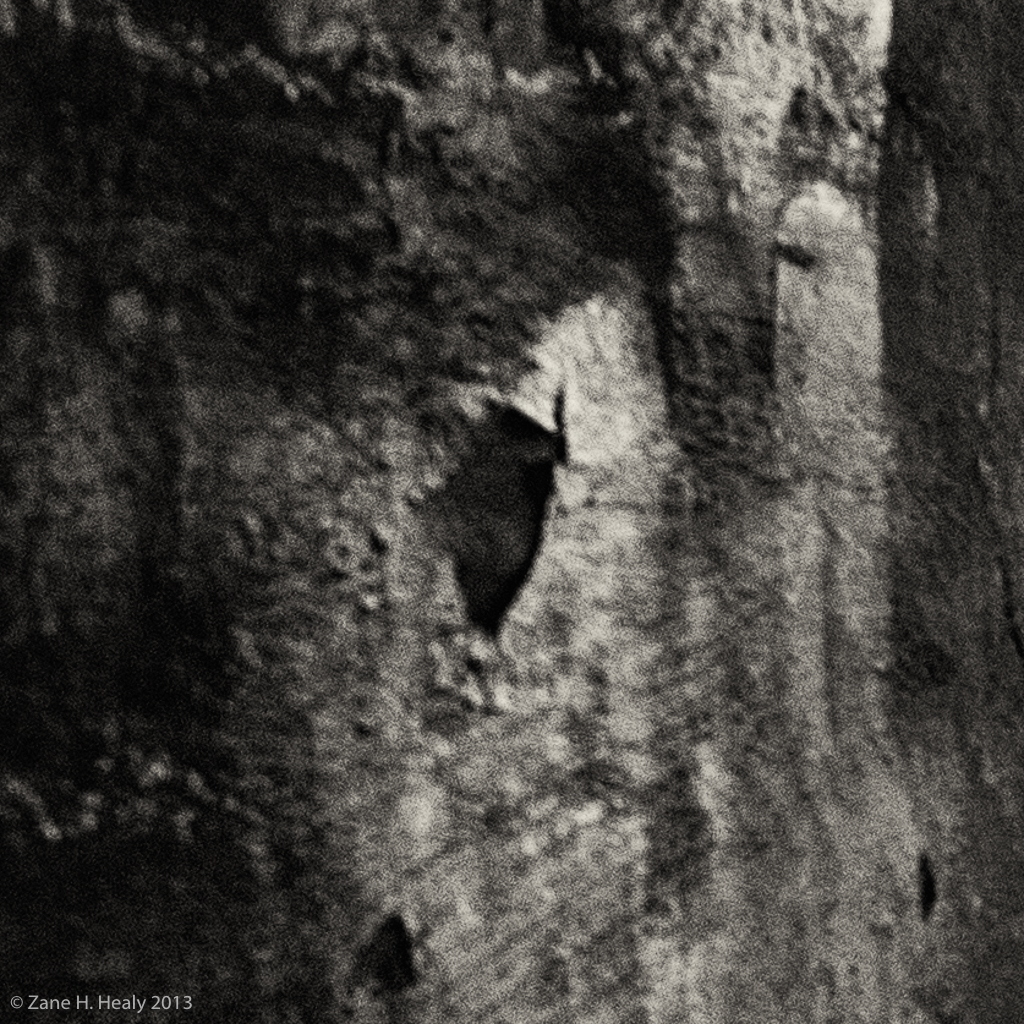
Noise Level with Adobe Lightroom CC (2015) – Click on photo to view at 100%
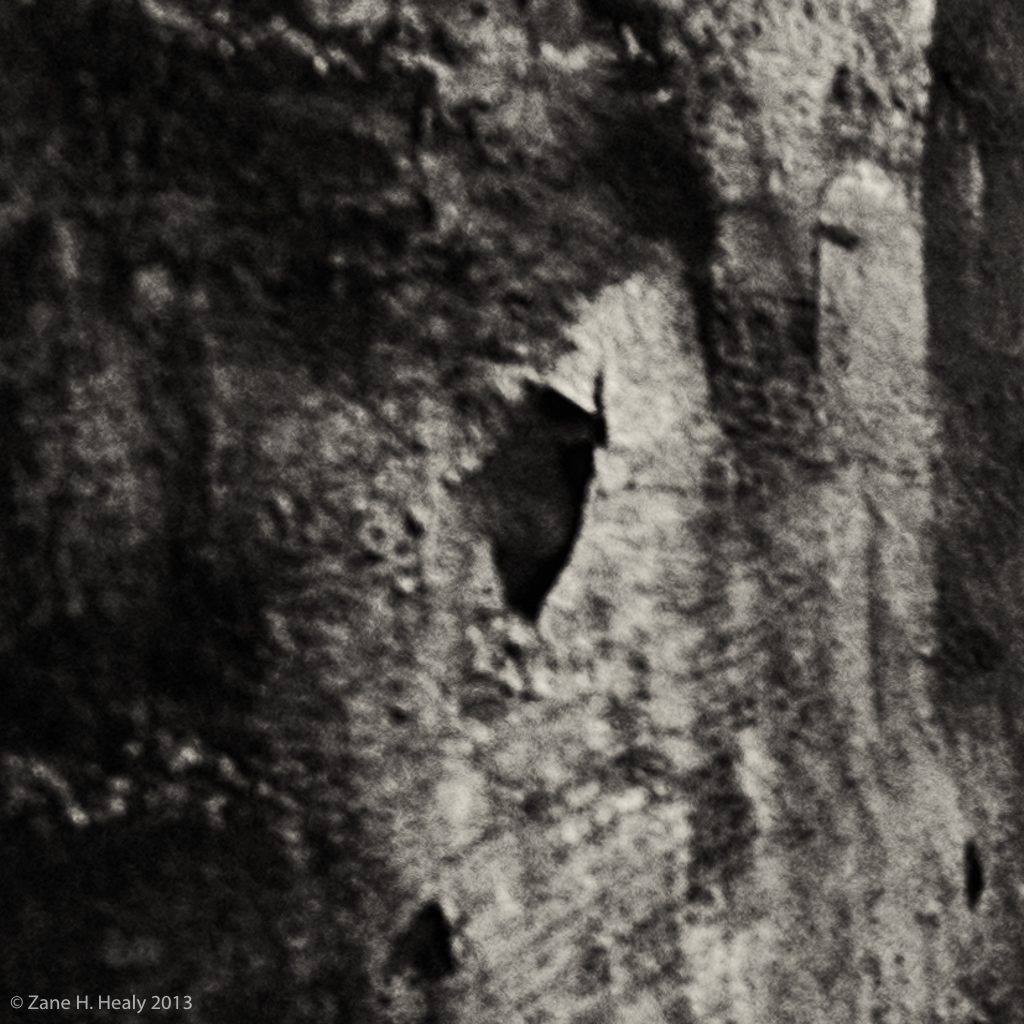
Noise Level with Capture One 8.3.3 – Click on photo to view at 100%
Thoughts on Capture One, and Digital Workflows
One of the cool features that was added recently to Capture One Pro 8.1, is the “Round-Trip” feature. This allows you to send the photo to an external editor, in this case, Silver Efex Pro 2, and then return to Capture One when you’re done to continue your editing session. This works especially well with my rather odd workflow, and is a distinct improvement over Capture One v6, where I had to export the image from Capture One, and then reimport it into Adobe Lightroom for further editing.
My typical workflow is as follows. I import the images into Adobe Lightroom. From there I can either edit them in Adobe Lightroom, use Adobe Bridge to open them in ACR (and then Photoshop), or I can access them from the Session I have open in Capture One. This is where the new “Round-Trip” feature really comes into play. When I use this option, the resulting TIFF is placed in the same directory, and I simply have to use the “Synchronize Folder” option in Adobe Lightroom for the images to be available in Lightroom. Then I can use Lightroom to export it to Flickr, or my Photography website, or I can print it.
Capture One includes what is supposed to be a very good alternative to Adobe Lightroom, and it supports importing Apple Aperture or Adobe Lightroom libraries, but I’ve not tried it, as I’m happy with my current solution. In my mind at least, the way I’m doing things allows for far greater flexibility than using Capture One to maintain my catalog.
Printing with Capture One
Capture One includes the ability to print photos, and when I first purchased my Epson R3000 printer, I found that Capture One v6 gave accurate results, while I couldn’t get good results from the versions of Adobe Lightroom and Photoshop that I was using at the time. So far I’ve only tried to print “Tunnel’s End” with Capture One v8, and it’s obvious that I’m going to have to do some studying up on what formats it’s able to print. In order to get the print I was after, I ended up needing to use Lightroom CC for printing. I’m pretty sure Capture One doesn’t like the format that Silver Efex Pro 2 saved the finished image in.
Great write-up and testings!